THE BEST GREEK YOGURT YOU WILL EVER EAT...

by 👩‍🍳 Cooking With a Southern Vibe in Music City USA 👩‍🍳, May 25, 2014

Making greek yogurt

This is seriously the best yogurt you will ever put in your mouth!

I’ve been making my own Greek Yogurt for a couple of years now.  I first heard about how to do it from Paula at Salad In a Jar, tried it, and was instantly hooked.  I’ve made it many times now, both with whole milk, 2% and skim, and of course making it with whole milk is by far the best!   It’s high in protein, satisfying, so creamy and smooth, there is no comparison to homemade and the yogurt you buy in the store.  And it’s strawberry season, homemade greek yogurt topped with fresh strawberries and blueberries is completely decadently delicious!

I’ve blogged about it before, and updated it several times after I invested in a Boullion Strainer and a YoGourmet Electric Yogurt Maker.  And somethings are just too good not to share again.

So let’s go back into my archives on this Memorial Day eve, and read again about how to make the most amazing yogurt you will ever put in your mouth.

Try it, you will love it, I pinky swear you will.  ~ Jan

Jan Makes Greek Yogurt


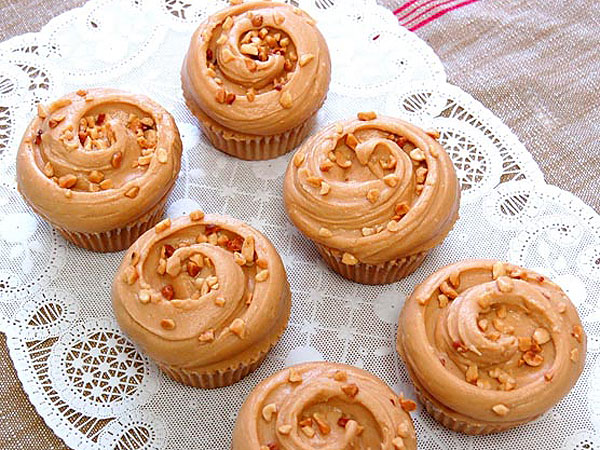
MAGNOLIA BAKERY'S PEANUT BUTTER & JELLY CUPCAKES

by 👩‍🍳 Cooking With a Southern Vibe in Music City USA 👩‍🍳, May 19, 2014

NewImage

Peanut Butter Cupcakes
Makes 36

3 cups all-purpose flour
1 tsp. baking powder
½ tsp. baking soda
½ tsp. salt
1¼ cups whole milk
2 tsp. vanilla extract
1½ cups creamy peanut butter
4 oz. butter (at room temperature)
2 cups granulated sugar
1 cup packed brown sugar
6 large eggs
Jelly, for filling

1. Preheat oven to 325°. Line the cupcake pan with paper liners.

2. In a small bowl, whisk together flour, baking powder, baking soda and salt; set aside.

3. In a liquid measuring cup combine milk and vanilla; set aside.

4. In the bowl of an electric mixer fitted with the paddle attachment, place peanut butter, butter, granulated sugar and brown sugar. Beat on medium speed for 3 minutes.

5. Add eggs to the creamed mixture, one at a time, beating well after each addition and making sure to scrape sides and bottom of bowl.

6. Add flour mixture and milk with vanilla in three parts beginning and ending with the flour mixture, blending just until combined after each addition.

7. Scrape down the sides and bottom of the mixer bowl.

8. Bake 22-25 minutes or until cake tester comes out clean and cupcakes start to pull away from the sides of the pan.

9. Remove from the oven and cool in the pan for 20 minutes. Remove from the pans and cool completely.

10. Using the blunt end of a wooden spoon, punch a hole into the center of each cupcake. Place jelly in a piping bag or small plastic bag with the end snipped off. Squeeze about 1 tbsp. of jelly into the center of each cupcake. Ice generously with buttercream frosting (recipe below).

Peanut Butter Buttercream Frosting

1½ cups creamy peanut butter
8 oz. butter (at room temperature)
½ cup whole milk
1 tbsp. pure vanilla extract
5 cups confectioner’s sugar, sifted before you measure
2 cups jam (any flavor)

1. In the bowl of an electric mixer fitted with a paddle attachment, beat peanut butter and butter until light and fluffy and butter is completely incorporated (no lumps). Do not overmix.

2. In a liquid measuring cup, combine milk and vanilla; set aside.

3. Add half of the confectioner’s sugar and half of the milk-vanilla mixture and beat on low speed until just incorporated.

4. Scrape the sides and bottom of the bowl.

5. Add the remaining confectioner’s sugar and milk-vanilla mixture and beat on low speed until just incorporated.

6. Scrape the sides and bottom of the bowl. Icing should be smooth and creamy—do not over mix.

Adapted from a recipe from People Magazine
Photo Courtesy of People Magazine

GUY WELLIVER'S FAMOUS SCALLOPED CABBAGE

by 👩‍🍳 Cooking With a Southern Vibe in Music City USA 👩‍🍳, May 17, 2014

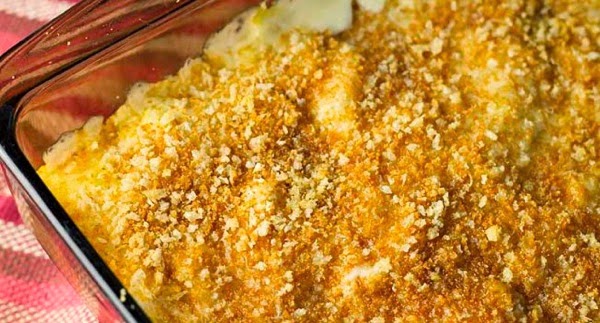
Creamedcabbage

Back in the 70’s there was Guy Welliver’s Smorgasboard in Hagerstown, Indiana.  It’s gone now, but back in the day they had the most wonderful food, we went on special occasions and it was unlike any smorgasbord you’ve ever eaten at.  Everything homemade, delicious midwestern dishes, homemade breads, the most decadent desserts and their specialty,  Scalloped Cabbage.

It was hubby’s very favorite dish, the man just adored it.  It was a simple dish, cooked cabbage, a Bechamel sauce, lots of cheese and toasted buttered crumbs on top.

I recreated it in my kitchen and it has been a favorite ever since.  It can be made ahead and baked at the last minute, it travels well, it’s just a great comfort food cabbage recipe.

4 cups cabbage, coarsely chopped
2 Tablespoons butter
2 Tablespoons all-purpose flour
1/4 teaspoon salt
1/8 teaspoon pepper
1 cup milk
8 ounces Velveeta Cheese, cubed

Boil cabbage in a dutch oven with salted water until tender, this takes approximately 15 minutes.  I have on occasion used chicken stock instead of water for a richer flavor.

Meanwhile, prepare the white sauce.  Melt butter over low heat, stir in flour, salt and pepper, cook over medium heat stirring constantly until smooth and bubbly, remove from heat.

Gradually stir in milk, heat to boiling, stirring constantly (a whisk works well); drop in the chunks of Velveeta and boil and stir 1 minute.

Pour drained cabbage in a 9” casserole, pour cheese sauce over the top and top with buttered bread crumbs.

Buttered Crumbs:

1 cup breadcrumbs (pulse torn pieces of bread in a food processor until fine
2-3 Tablespoons melted butter

Mix together and sprinkle over the top of the cabbage

Bake in a 375 oven approximately 30 minutes until casserole is bubbly and crumbs are brown

Note:  I’m a huge fan of Velveeta for cheese sauces.  I find that cheddar separates and is oily, but Velveeta melts into a Bechamel sauce beautifully.

Also, if you like a lot of sauce you might want to double the Bechamel.  This is one of those recipes that you just  play with and make it your own ~ Jan 

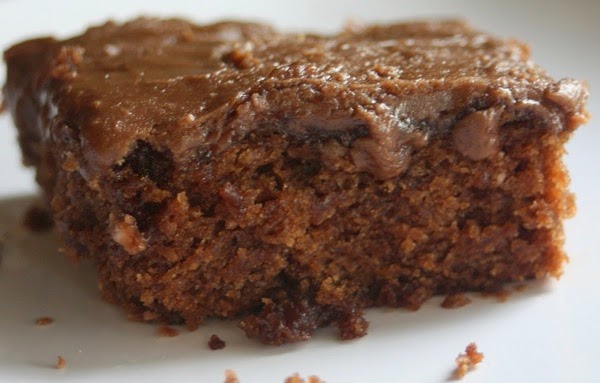
Texas Sheet Cake

by 👩‍🍳 Cooking With a Southern Vibe in Music City USA 👩‍🍳, May 15, 2014

Sheetcake

I’ve loved Texas Sheet Cake since my mother introduced it to me in the 70’s.  It’s a family favorite, we’ve tried all kinds of different variations, including peanut butter, and Coca-Cola sheet cake, but we always come back to this recipe.  It’s just the best, moist, gooey, delicious, decadent dessert.  What could be better… ~ Jan

For the Cake:

  • 1/2 cup buttermilk
  • 2 eggs
  • 2 cups granulated sugar
  • 2 cups all purpose flour
  • 1 teaspoon baking soda
  • 1/2 teaspoon kosher salt
  • 2 sticks (1 cup) of unsalted butter
  • 2 tablespoons canola oil
  • 1 cup water
  • 6 tablespoons of unsweetened cocoa
  • 1 teaspoon of pure vanilla extract
  • For the Frosting:

    • 1 stick (1/2 cup) of unsalted butter
    • 6 tablespoons of milk
    • 4 tablespoons of unsweetened cocoa
    • 1 (1 pound) box of powdered sugar
    • 1 teaspoon of pure vanilla extract
    • 1 cup of chopped pecans, toasted,optional
    • 1 cup coconut, optional

    Instructions

    Preheat oven to 350 degrees. Spray a 9 x 13 inch pan with Pam.  Some recipes call for making this in a jelly roll pan, but our family likes thick cake, so I always make it in a 9x13.

    In a measuring cup, measure out 1/2 cup of buttermilk. Add 2 eggs to that and beat until well blended; set aside. Whisk together in a large bowl, 2 cups sugar, 2 cups flour, 1 teaspoon baking soda, and 1/2 teaspoon salt. Make a well in the center and set aside.

    In a medium saucepan, combine the 2 sticks of butter, the 2 tablespoons oil and 1 cup of water and bring to a near boil. Remove pot from the heat and whisk in 6 tablespoons of cocoa, until smooth. Stir in 1 teaspoon of vanilla and add this mixture to the sugar and flour mixture; stir until well blended. Slowly add in the buttermilk and egg mixture and stir well.

    Pour the batter into the prepared pan and bake at 350 degrees until the center is set, about 20 to 25 minutes for a sheet cake, about 35 to 40 minutes for a regular 9 x 13 inch pan. While the cake is cooking, toast the pecans in a dry pan, tossing regularly until fragrant, about 5 minutes, set aside to cool.

    When cake is about 5 minutes from being done, prepare the frosting. Do not do the frosting ahead of time because it will quickly stiffen. Heat the stick of butter and 6 tablespoons of milk in a saucepan just until it comes to a boil. It will need to be very hot. Remove from the heat and whisk in the remaining 4 tablespoons of cocoa. Mixture will thicken. Add in the powdered sugar and vanilla and quickly beat with a wooden spoon until smooth, returning to a low burner if mixture thickens too quickly. Immediately stir in coconut and nuts if desired and pour the frosting all over the cake. Working quickly, use a spatula to gently push the frosting out to the edges and to cover the cake evenly. Sprinkle top evenly with the additional toasted pecans, if desired. Set entire pan aside on a wire rack and allow the cake to cool completely before slicing.

    Cook's Notes: When the cake comes out of the oven, quickly poke holes all over it and then pour the icing on top.

    Tips: This will be a very moist cake, so you aren't looking for a dry surface when it is done. As always, take care to not overcook your cake. If you shake the pan and the cake doesn't jiggle, it's done! Frosting will set fast, so ya gotta move fast! If your frosting stiffens too quickly, you can also thin it with a little additional milk if needed, and return it to a low heat.  This cake is better after it sits overnight, even better after it ages a couple of days, but who can wait that long!


    Pink Lemonade Strawberry Shortcake

    by 👩‍🍳 Cooking With a Southern Vibe in Music City USA 👩‍🍳, May 07, 2014

    Pink Lemonade Shortcake RU225720

    Ingredients

    • 6 cups sliced strawberries
    • 1/4 cup granulated sugar (optional)
    • 2 cups all-purpose flour
    • 1 tablespoon baking powder
    • 1/2 teaspoon cream of tartar
    • 1/2 teaspoon baking soda
    • 1/4 teaspoon salt
    • 1/2 cup butter
    • 1/2 cup buttermilk or sour milk*
    • 1/4 cup frozen pink lemonade concentrate, thawed
    • 1/2 teaspoon finely shredded lemon zest
    • 2/3 cup whipping cream
    • 1 8 - ounce carton mascarpone cheese or tub-style cream cheese
    • 3/4 cup sifted powdered sugar
    • 1 teaspoon lemon zest
    • Lemon zest (optional)

    Directions

    1. In a medium mixing bowl, stir together strawberries and, if desired, the granulated sugar. Set aside.
    2. For the shortcake: In a medium mixing bowl, combine the flour, baking powder, cream of tartar, baking soda and salt. Cut in the butter until mixture resembles coarse crumbs. Make a well in the center; add the buttermilk, lemonade concentrate and the 1/2 teaspoon lemon zest all at once. Stir just until dough clings together.
    3. On a lightly floured surface, knead dough gently for 10 to 12 strokes. Pat dough into an 8-inch circle on a baking sheet lined with parchment paper. Bake in a 400 degrees oven for 16 to 18 minutes or until golden. Cool slightly.
    4. Meanwhile, for Lemon Mascarpone Cream: In a medium mixing bowl beat the whipping cream with an electric mixer on low speed just until soft peaks form. Add the mascarpone cheese, powdered sugar and 1 teaspoon lemon zest; beat until fluffy (mixture will thicken as it is beaten).
    5. Using a large serrated knife, gently split warm shortcake horizontally into 2 layers. Using a wide spatula to help support the layers as you move them, place bottom layer on serving platter. Spread with about two-thirds of the mascarpone cheese mixture. Spoon some of the strawberries onto mascarpone cheese layer. Again using a spatula to help support the layer, add shortcake top. Spread with the remaining mascarpone cheese mixture and top with more of the strawberries. Sprinkle top with additional lemon zest, if desired. Pass any remaining strawberries. Serve immediately, cutting into wedges and passing any remaining strawberries.
    In a hurry?  Substitute the Bisquick Recipe on the Box for the Shortcake.  Not quite as good, but still positively yummy.  ~ Jan
     
    Adapted from a Midwest Living Recipe


    © Jan CAN Cook · THEME BY WATDESIGNEXPRESS